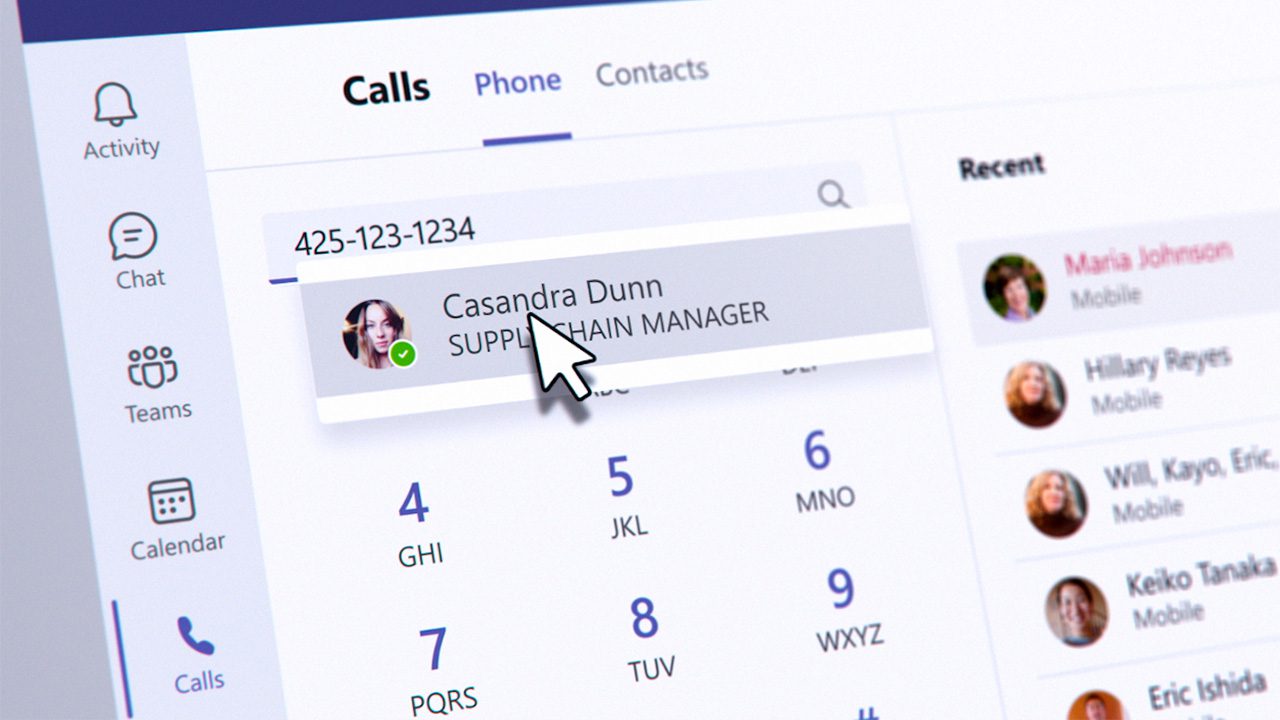
Do you have PSTN Calling in Microsoft Teams via Calling Plans, Operator Connect, or Direct Routing? Are you manually updating your users’ telephoneNumber attribute in your on-premises Active Directory every time you onboard a new user to Microsoft Teams Calling? In this article, I will show you how to sync Teams phone numbers with Azure Active Directory (AAD) and On-Premises Active Directory (AD) with an easy-to-use script. I’ll walk you through how to set it up and run it to save you time and headaches.
TL;DR
- Microsoft currently has no built-in means to push a user’s Teams Calling phone number to AAD or AD directly. IT teams are left to figure out on their own how to sync Teams phone numbers with other applications.
- To eliminate this hassle and make your life easier, we have developed a script that updates the telephoneNumber attribute automatically for all your users.
- After some initial setup, you can download the script right in this article and, with some additional configuration, run it
If your organization is using Teams, you need your users’ Teams Calling numbers (LineURI) to be reflected in crucial business applications. Most of these programs pull your users’ numbers by syncing with AAD, although many legacy applications do continue to sync with AD.
Unfortunately, Microsoft currently offers no built-in solution to push a user’s Teams Calling number to AAD or AD directly. This is a huge hassle.
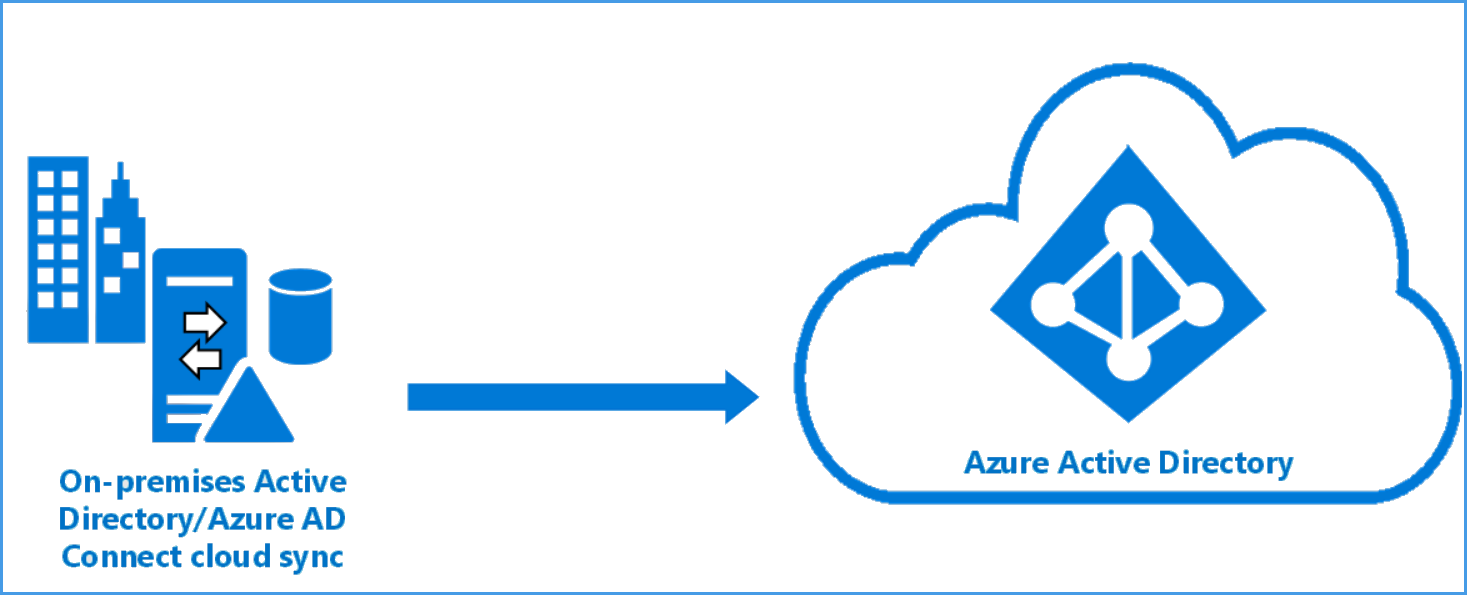
To their credit, they do help alleviate part of this problem with Azure AD Connect, which allows for one-way synchronization from AD to AAD (but not the other way around). But it adds no value until you manually update AD with the Teams Calling number.
Azure AD Connect still fails to solve the root problem as it does not completely bridge the gap between Teams Calling and AD/AAD.
Our customers have repeatedly expressed their frustration about this, and I don’t blame them. It is painful to manually intervene after every Teams Calling user is onboarded or whenever a user’s number changes.
How to Sync Teams Phone Numbers (LineURI) with Active Directory
To eliminate this hassle, we developed an easy-to-use script (which you can download below) to bridge the gap between Teams Calling and AAD/AD. It connects to your Teams tenant, grabs the assigned Teams Calling numbers of all your users, and then updates the telephoneNumber attribute of those users in On-Premises AD. Azure AD Connect can then be used to push that same information up from AD to AAD – gap bridged!
What You Will Need
- Microsoft 365 User Account with Teams Administrator Role: This account will be used to query your Microsoft Teams tenant and retrieve the assigned number of all your active Teams Calling Users.
- On-Premises AD Service Account with Write Permission to a Search Base: This account will be used to update the newly onboarded Teams Calling Users’ telephoneNumber attribute in your On-Premises Active Directory.
- Windows Machine: The script will need to run from a Windows machine with network access to both On-Premises AD and your Microsoft Teams tenant. It will also need to have the relevant PowerShell modules installed to support the commands executed by the script.
- Our Script: The script will query your Microsoft Teams Tenant for all users with a Teams Calling number and write the value to the respective user’s telephoneNumber attribute in your On-Premises Active Directory.
How to Set Up the Script
Step 1: Determine the Search Base Containing Teams Calling Users
The AD Service account which will update the telephoneNumber attribute of your users will need write permissions. To provide the most granular level of permission needed, you’ll want to identify the Search Base of your target users.
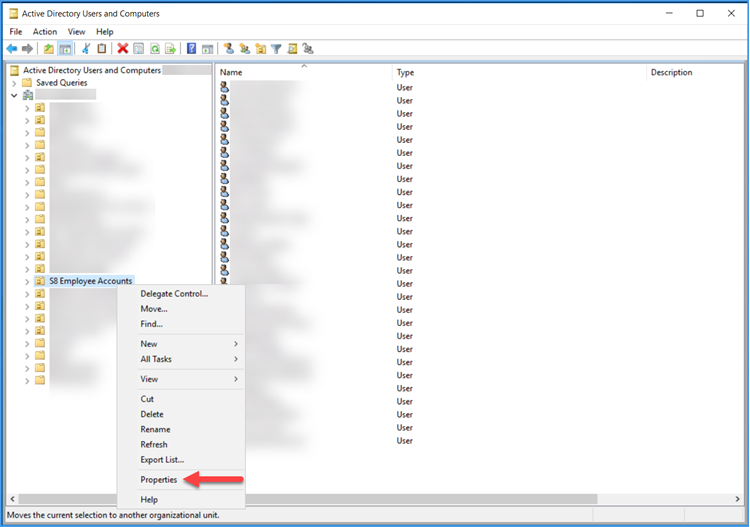
First, find the directory or sub-directory containing your Teams Calling users, right-click and select Properties.
Select the Attribute Editor tab and find the distinguishedName attribute and click View.
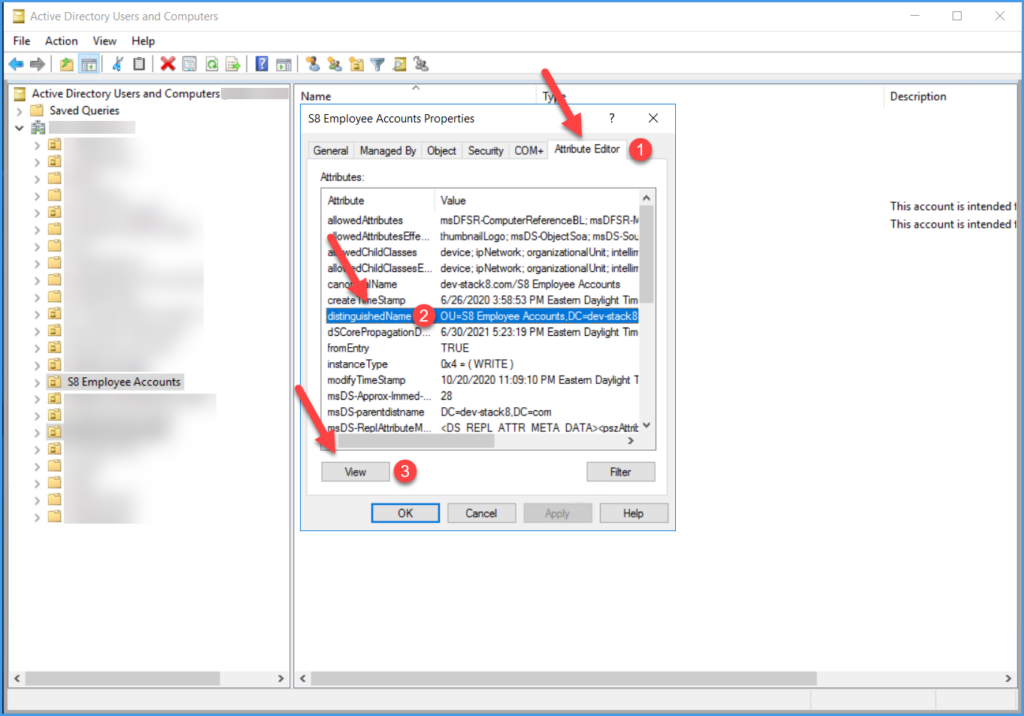
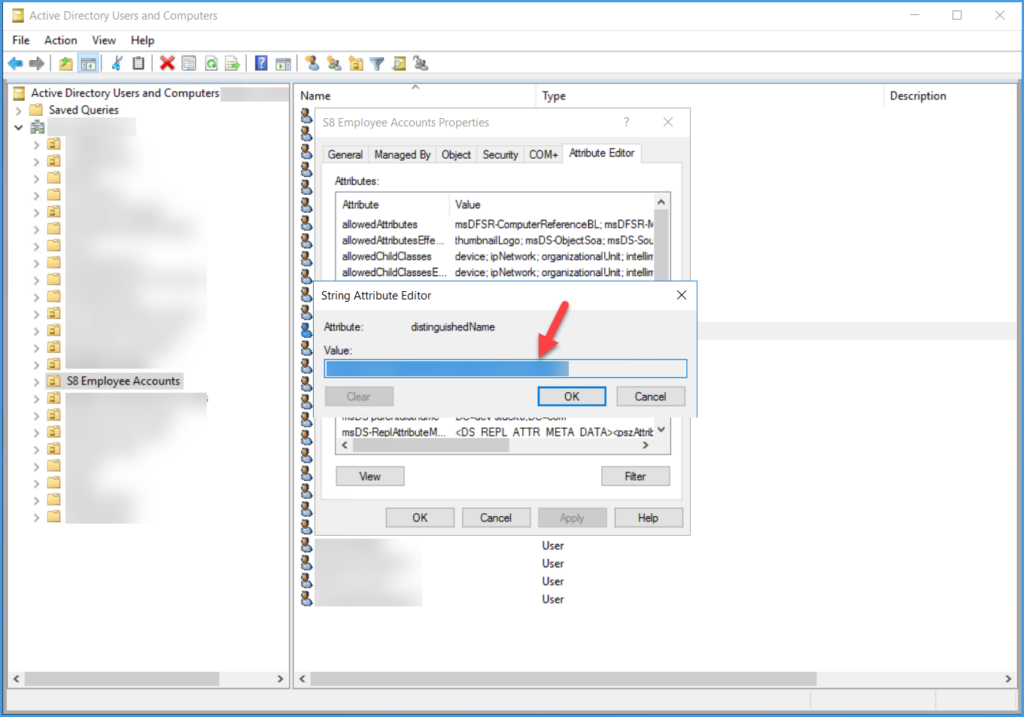
Take note of this value, it will be required to configure the script.
Step 2: Create On-Premises AD Service Account with Write Permission to telephoneNumber Attribute
Now, you’ll need to create the AD service account with the required write permission to the telephoneNumber attribute for users part of the Search Base identified in the previous section.
1) Connect to your On-Premises AD server via Remote Desktop.
2) Create a user.
3) Provide the user account with write permission to the telephoneNumber attribute for the OU your users are located in.
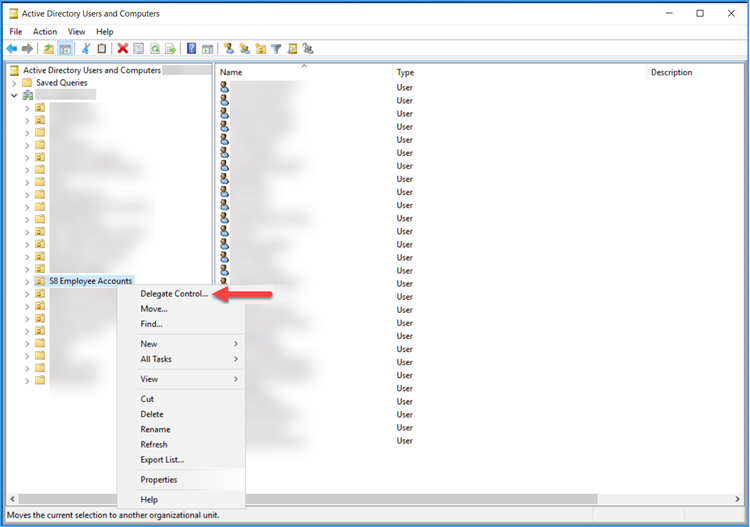
Right-click the OU which contains your Teams Calling users and select Delegate Control.
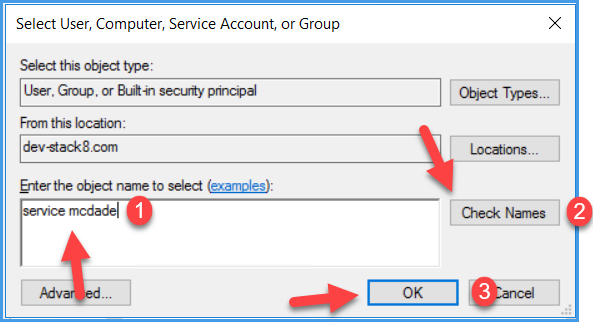
Use the Delegation of Control Wizard to find and select the user created in step 2. Click OK, then click Next.
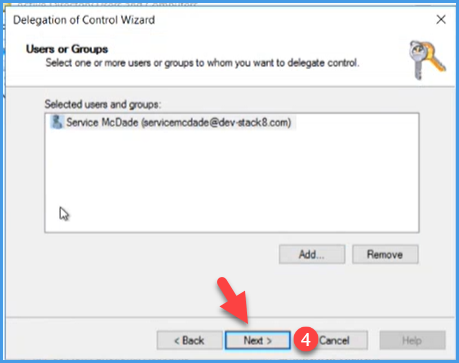
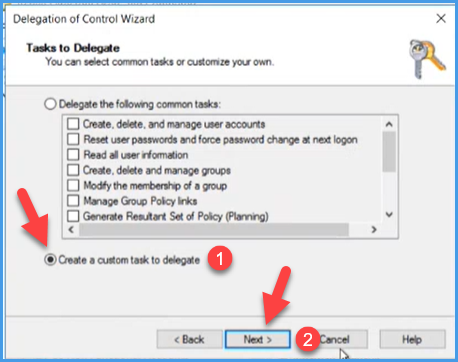
On the Tasks to Delegate screen, select the 2nd radio button Create a custom task to delegate and click Next.
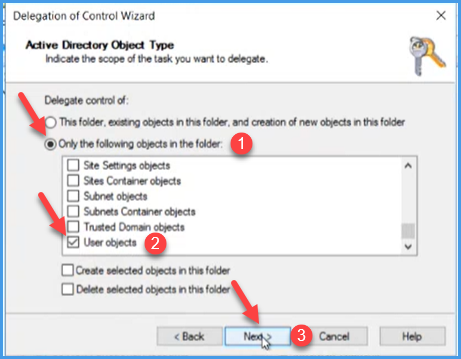
You’ll then see the Active Directory Object Type screen. Select the 2nd radio button Only the following objects in the folder, then enable the User Objects checkbox and click Next.
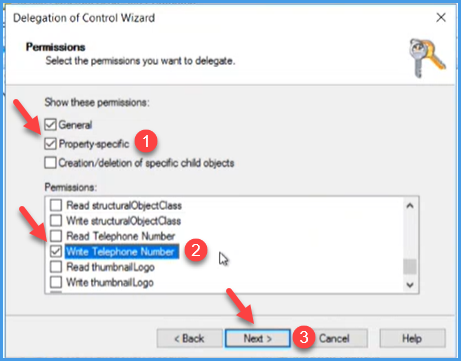
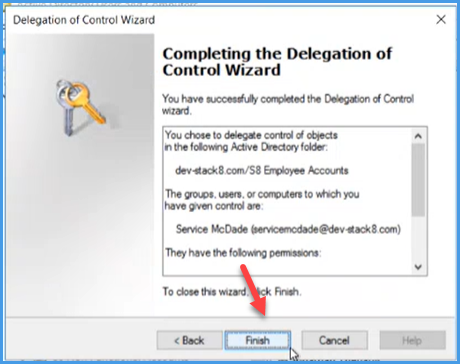
Finally, on the Permissions screen, enable the Property Specific checkbox. Under the Permissions list, enable the Write Telephone Number checkbox and click Next. On the next screen click Finish.
Step 3: Create Microsoft 365 Admin Account with the Teams Administrator Role assigned
To create the required Microsoft 365 Admin account, you have 2 possible options:
Option 1 – Use the same account created for On-Premises AD
Recycle the same On-Premises AD account you created in the previous section by performing a manual sync between your On-Premises AD and your AAD. This will push the account to AAD and make it available for you to select and configure it from your Microsoft 365 tenant.
1) Connect to the windows machine from which you’ll be running the script.
2) Search for PowerShell from the Start Menu, right-click PowerShell, and Run as Administrator
3) Run the following command:
Start-ADSyncSyncCycle -PolicyType Delta
Note: If you encounter any issues running the command, consult this Microsoft knowledge base article.
Option 2 – Create a new Admin account directly in the Microsoft 365 Admin Center
Follow the walkthrough guide for Creating a PowerShell Account available here.
Step 4: Prepare Windows Machine from which the Script Will Run
You’ll need to run the script from a Windows machine that meets the following requirements.
- Network Access to your On-Premises AD
- Network Access to your Microsoft Teams Tenant
- Required PowerShell modules installed
- Active Directory
- Microsoft Teams
How to install Microsoft Teams PowerShell Module
1) Connect to the windows machine from which you’ll be running the script.
2) Search for PowerShell from the Start Menu, right-click PowerShell 7 (x64) and Run as AdministratorNote: Make sure to select PowerShell 7, as this version uses the most recent cmdlets required by the script.
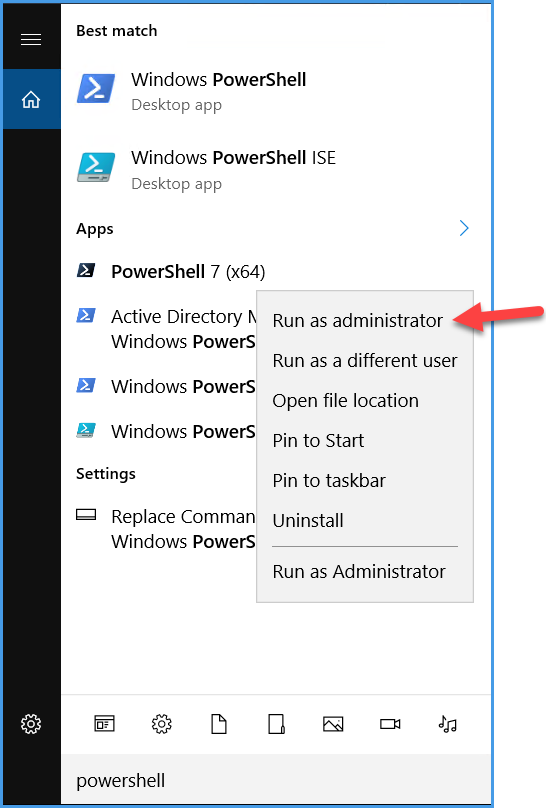
3) Run this command:
Install-Module -Name MicrosoftTeams
How to install Active Directory PowerShell Module
Repeat steps 1 and 2 from above, then run this command:
Add-WindowsCapability -Name Rsat.ActiveDirectory.DS-LDS.Tools~~~~0.0.1.0 -Online
Note: If you encounter any issues running the command, consult this knowledge base article.
Download and Run the Script
Import-Module ActiveDirectory
Import-Module MicrosoftTeams
# This script logs the results of the update operations to the console.
# If needed, you can redirect these to a log file (e.g.: `.\script.ps1 6> .\results.log`).
####### Set the following variables
$msTeamsUserName = 'jdoe@contoso.com'
$msTeamsPassword = 'YOUR_PASSWORD_HERE'
$adUserName = 'jdoe'
$adPassword = 'YOUR_PASSWORD_HERE'
$searchBase = 'OU=S8 Employee Accounts,DC=dev-stack8,DC=com'
#######
function Create-Credential {
    param (
        $UserName,
        $Password
    )
    $securePassword = ConvertTo-SecureString -String $Password -AsPlainText -Force
    return New-Object -TypeName System.Management.Automation.PSCredential -ArgumentList $UserName, $securePassword
}
$adCredential = Create-Credential -UserName $adUserName -Password $adPassword
$msTeamsCredential = Create-Credential -UserName $msTeamsUserName -Password $msTeamsPassword
Connect-MicrosoftTeams -Credential $msTeamsCredential
$voiceUsers = Get-CsOnlineUser -Filter {EnterpriseVoiceEnabled -eq $True} | Select UserPrincipalName, LineUri
foreach ( $voiceUser in $voiceUsers )
{
    $upn = $voiceUser.UserPrincipalName
    try
    {
        $adUserToUpdate = Get-ADUser -Credential $adCredential -Filter "userPrincipalName -eq '$upn'" -SearchBase $searchBase
        if ($null -eq $adUserToUpdate)
        {
            Write-Host "WARNING: Could not update user $upn - user does not exist in local AD" -ForegroundColor Yellow
            continue
        }
        $phoneNumber = $voiceUser.LineUri.replace('tel:', '').split(';ext=')[0]
        Set-ADUser -Credential $adCredential -Identity $adUserToUpdate.DistinguishedName -Replace @{telephoneNumber=$phoneNumber}
        Write-Host "Updated user $upn with phone number $phoneNumber"
    }
    catch
    {
        Write-Host "ERROR: Something went wrong when trying to update user $upn - $PSItem" -ForegroundColor Red
    }
}
What the Script Does
The script will perform the following actions:
- Connect to Microsoft Teams and gather all phone numbers (LineUri’s) for voice-enabled users (i.e. users whose enterpriseVoiceEnabled flag is set to true) via the Get-CsOnlineUser cmdlet
- For each voice user returned:
- Get the LineURI of the user
- Set the LineURI in AD via Set-ADUser
How to Configure the Script
Update the script to reference your account(s) and environment information.
- Update the $msteamsUserName to the UPN of the Microsoft 365 Admin account with Teams Administrator role created in the earlier section [anchor link].
- Provide the associated $msteamsPassword for the account.
- Update the $adUserName to the samAccountName of the On-Premises AD service account created in the earlier section [anchor link].
- Provide the associated $adPassword for the account.
- Provide the $adSearchBase identified in the earlier section.
You’re ready to run the script!
Running the Script
Now that you’ve identified your Windows machine and fulfilled all the requirements needed for the script to run, we can run the script.
1) Search for PowerShell from the Start Menu, right-click PowerShell 7 (x64) and click Run as Administrator.
Note: Make sure to select PowerShell 7, this version uses the most recent cmdlets required by the script.

2) From the PowerShell terminal, use the change location command to locate the script. In this example that would look like this:
cd C:\Users\s8support\Desktop\ziroscript\
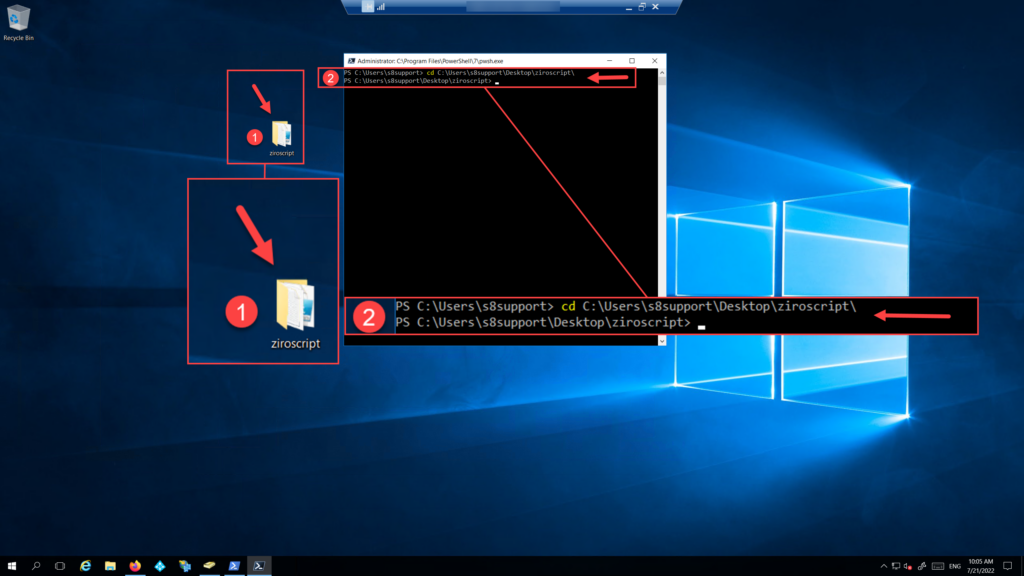
3) You can now run the script. In this example, the name of the script is “script”, so that would look like this:
.\script.ps1
Although the script will log the results of the update operations in the console, you can also redirect these to a log file by running the script like this:
.\script.ps1 > .\results.log
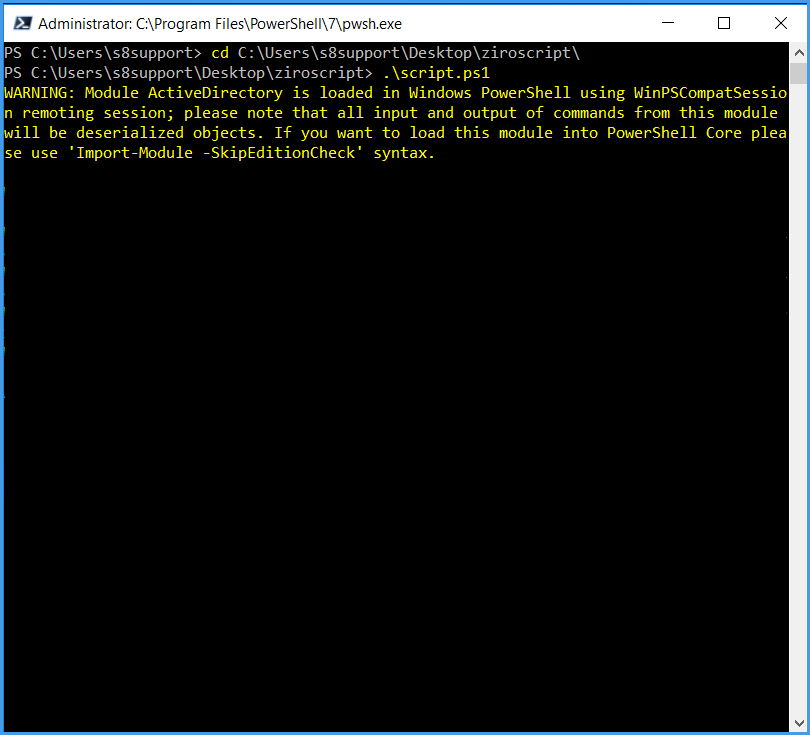
Please note that the script will scan all your Microsoft Teams Users to determine which have a LineURI configured and update their telephoneNumber attribute in On-premises AD. The amount of time required for the script to run will vary depending on the number of users in your environment.
In this example, the script identified 3 users with LineURI’s which were not set in On-Premises AD and updated the telephoneNumber attribute of those users with the relevant Teams Calling LineURI.
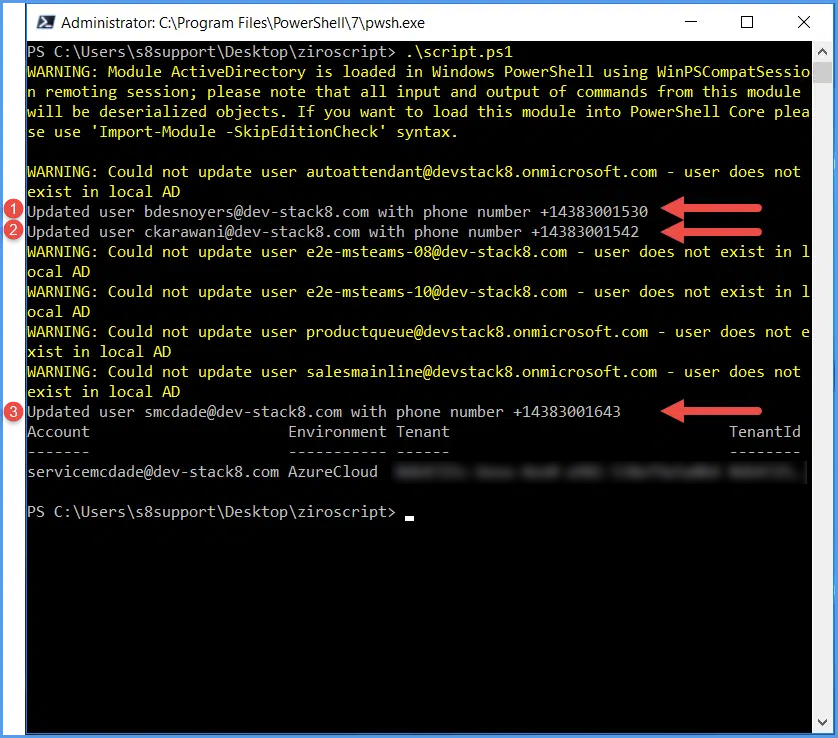
Notice the warnings about users which were found in the Microsoft Teams tenant, but that do not exist in On-Premises AD. You can ignore these as they are not valid targets of the script.
And that’s it – you’re all done!
You Know How to Sync Teams Phone Numbers with Active Directory. What Now?
Now that you know how to sync Teams phone numbers with AD/ADD, you can spend less time manually updating the telephoneNumber attribute and more time on the work that really matters.
If you have any questions about the script or hit any snags, don’t hesitate to reach out! Our UC experts can answer any of your Teams Calling questions.
Looking for even more simplicity? Our no-nonsense software empowers your helpdesk so you can offload even more of those tedious routine MS Teams tasks without worrying about complicated templates or accessing the MS Teams Admin Center. Click here to discover how ZIRO Provisioning for Microsoft Teams can make your life easier.
Ready to take your unified communications from headache to hassle-free?
No throwing darts at proposals or contracts. No battling through the back-end. No nonsense, no run-around.


